


Tips And Tricks For Making Your Own Sounds (Sound Design And Synthesis)
Tips And Tricks For Making Your Own Sounds (Sound Design And Synthesis)
Sound design. One of perhaps the more daunting terms in music production, sound design and synthesis is up there (for me at least) as one of the most important, and also challenging, aspects of music production. However, it must also be said that creating your own sounds is also probably the most fun part as well - I mean basically you just get to make as much noise as you want and if it works then great, if not, well who cares? With this being the case, allow me to share with you some tips and tricks to help aid you in your quest to make the dirtiest bass to grace the Earth, or indeed a synth so fat only a mother could love it. In this blog I will be providing you with 7 techniques/methods which will be aimed to help you find method in the madness and get you on your way to making your own unique sounds.
Let’s get started…
1. Have A Reference Track
So, I’m sure you’ve heard about the importance of utilising reference tracks for both the mixing and mastering processes, however, referencing your favourite track also aids greatly when it comes to sound design. This is because the pitch of a sound is really important when it comes to creating a sound (hence why some producers write their tracks in certain keys) and so to give yourself the best chance of recreating a sound it really helps to be working in the same key and register as the sound you are trying to recreate.
2. Layer Your Sounds
Whether you’re making a new bass or working on a new lead, the chances are your one synth line just isn’t cutting it. This is where layering comes in as this technique allows us to make the most out of our sounds - however, it is very important to remember that each layer must perform it’s own specific roll otherwise it can become very easy to overdo a sound and run the risk of phasing issues and masking.
A good example of layering is when making basses. For instance, one layer is just the sub bass (30-60Hz) and then you can have the main bass layer sitting on top (60Hz and above). You can even add a stereo widening layer on top as well if you really want!
Another example is layering your leads with White Noise - this is especially useful if you’re looking to produce EDM music

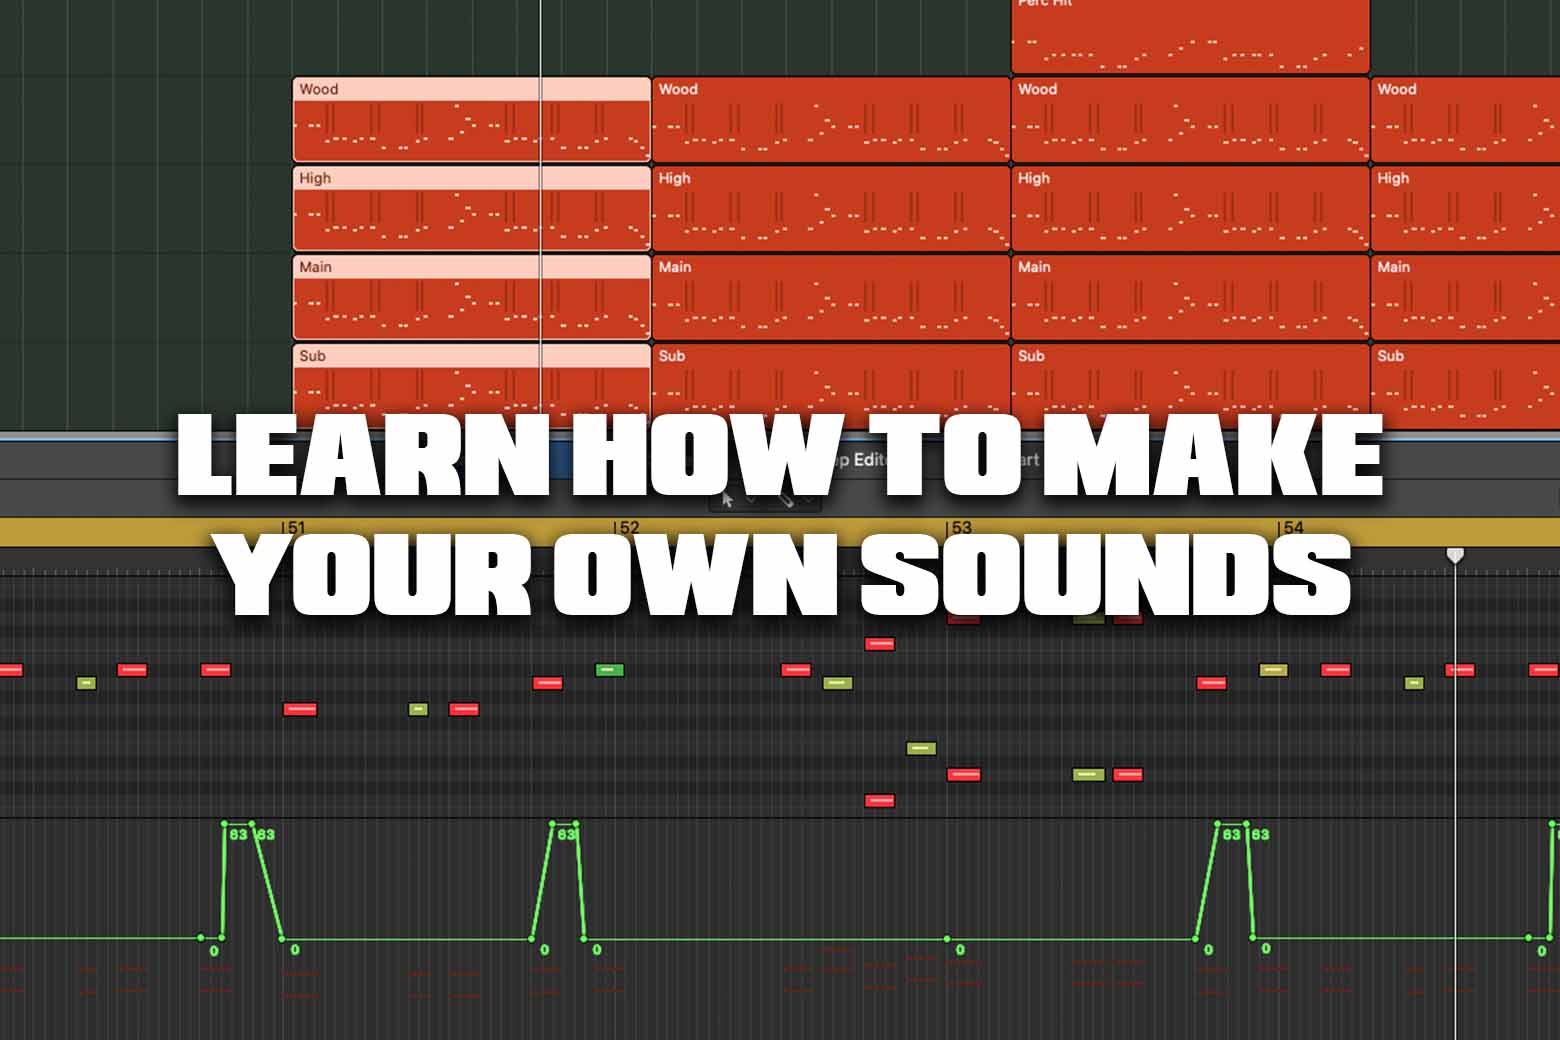
In this example I have layered a bass with four separate layers - a sub, the main bass, a bass layer pitched up an octave and then a percussion layer on top. Also, note the differing note lengths - we'll come onto that later. (Logic Pro X)
3. Use Real Instruments As Well As Synths
So, this is kind of following on from the previous tip of layering. Essentially, as well as stacking multiple layers made from your favourite synth, it is also quite interesting to layer your sounds with a real instrument. This can be anything really, ranging from a horn/trumpet to percussive elements (cowbell anyone?) - the choice is really up to you. One thing that is good to note as well when layering is that the overall sound is much more important than the individual elements making it up, so don’t be too concerned if each layer sounds a little terrible on it’s own as that isn’t the point!
4. Don’t Be Afraid Of Presets
One of the biggest mistakes I made when I first got into production was refusing to use the presets on my synths. Why was this? Well, basically, I wanted to have full control of my sounds and believed that making everything from scratch would make my tracks infinitely better. Now, I still believe that the end goal for a music producer should be to be able to make their own sounds, however, I think that presets are a perfect way to help you get on your way. I mean, how else are you going to understand how your synth works than by trailing through all the weird and whacky sounds that the developers have made? One of the most useful methods I found when starting learning more about sound design was to pick a preset that I liked the sound of and then try and make it from scratch - using the original preset as a sort of mark scheme to see how I did. The benefit of this was two-fold;
- I got to better understand the synth’s parameters and their unique functions on the sound.
- It allowed me to, through my inevitable mistakes, stumble on new sounds and ideas that I would have never thought about making before.
I also think this is the perfect point to mention one of my favourite tutorial programmes, Syntorial. Don’t worry this blog entry isn’t sponsored - I just think it’s a really cool programme and if you want to get better at sound design then definitely check it out!
5. Adjust Your MIDI Note Lengths
Now, you may be thinking that the sculpting of a sound is done purely within the synth. However, be prepared to have your mind blown. While yes, the majority of the sound is made by the synth, there are ways to change the sound further in your actual project. One simple way is by changing the length of your MIDI notes. For example, if you’re looking for a short pluck/stab sound you may be slaving over the ADSR (Attack, Decay, Sustain, Release) envelopes and trying to create your sound here, when in fact this can easily be achieved by shortening your MIDI notes in the Piano Roll to be super short. This is another reason why I have my grid view zoomed to /32 on Logic (as those of you who read my tips and tricks on Logic Pro blog will hopefully remember). Shortening your MIDI also allows for separation between notes - for example you may find that your bass doesn’t quite have that definition or punch that you are looking for; well my friend, just try shortening that MIDI and you may be surprised at the outcome!
6. Pitch Bend And Velocity
Sticking to the same area (sort of) as MIDI, making adjustments to the velocity and pitch of your note patterns can go a long way to improve your sounds. Adjusting the velocity of your individual notes can really help in defining your sound as well as in keeping it interesting. Pair this with the fact that you can map velocity changes with altering parameters on your synths and now you’re really cooking!
I’ve put pitch bend in here as well because I think it is one of the most effective means of taking a decent sound and making it great! Now, much like other effects and techniques, the trick to pitch bend is to not overdo it - to put it simply, not every note needs to wobble. I use pitch bend a lot for both my basses and my leads and I normally don’t have the bend range beyond 3 semitones either way; apart from for risers, then it’s 12 or 24.

Here you can see that I have altered the velocities and pitch bend of the MIDI pattern as well to help keep the track interesting. (Logic Pro X)
7. Automate
I have talked about automation in a previous blog and once again I am mentioning it here. Automation, at least for sound design, is a great way of sculpting a sound. For example, you can automate the volume of a synth so that it cuts out at certain points, keeping the mix nice and clean - or you can get creative and automate the mix of the reverb on the channel to add sweeps in the middle of a drop. Pretty much when it comes to automation, if you can change it you can automate it, so feel free to go bananas and see what you can come up with.

For this track you can see that I have automated the reverb to increase in level on the main sound during the gaps between notes. This is a really useful technique when it comes to making more full and interesting drops.
There you have it. These are 7 of my favourite techniques for making my own sounds. Of course there are plenty more ways to go about sound design so if I have left off your preferred method then please feel free to let me know. Anyway, I hope you have found this useful and perhaps, dare I say, inspired you to go about making your own outrageous sounds! If you would like 1-2-1 music production guidance in our studio or via Skype just get in touch by clicking here.